1 멀티 에이전트 감독자(Multi-Agent Supervisor)
이 튜토리얼에서는 LangGraph를 활용하여 다중 에이전트 시스템을 구축하고, 에이전트 간 작업을 효율적으로 조정하고 감독자(Supervisor)를 통해 관리하는 방법을 살펴봅니다.
여러 에이전트를 동시에 다루며, 각 에이전트가 자신의 역할을 수행하도록 관리하고, 작업 완료 시 이를 적절히 처리하는 과정을 다룹니다.
개요
이전 튜토리얼에서는 초기 연구자(Researcher) 에이전트의 출력에 따라 메시지를 자동으로 라우팅하는 방식을 보여주었습니다.
그러나 에이전트가 여러 개로 늘어나고, 이들을 조정해야 할 경우, 단순한 분기 로직만으로는 한계가 있습니다.
여기서는 LLM을 활용한 Supervisor를 통해 에이전트들을 관리하고, 각 에이전트 노드의 결과를 바탕으로 팀 전체를 조율하는 방법을 소개합니다.
중점 사항:
- Supervisor는 다양한 전문 에이전트를 한 데 모아, 하나의 팀(team)으로 운영하는 역할을 합니다.
- Supervisor 에이전트는 팀의 진행 상황을 관찰하고, 각 단계별로 적절한 에이전트를 호출하거나 작업을 종료하는 등의 로직을 수행합니다.
이 튜토리얼에서 다룰 내용
- 설정(Setup): 필요한 패키지 설치 및 API 키 설정 방법
- 도구 생성(Tool Creation): 웹 검색 및 플롯(plot) 생성 등, 에이전트가 사용할 도구 정의
- 도우미 유틸리티(Helper Utilities): 에이전트 노드 생성에 필요한 유틸리티 함수 정의
- 에이전트 감독자 생성(Creating the Supervisor): 작업자(Worker) 노드의 선택 및 작업 완료 시 처리 로직을 담은 Supervisor 생성
- 그래프 구성(Constructing the Graph): 상태(State) 및 작업자(Worker) 노드를 정의하여 전체 그래프 구성
- 팀 호출(Invoking the Team): 그래프를 호출하여 실제로 다중 에이전트 시스템이 어떻게 작동하는지 확인
이 과정에서 LangGraph의 사전 구축된 create_react_agent 함수를 활용해, 각 에이전트 노드를 간소화합니다.
이러한 “고급 에이전트” 사용 방식은 LangGraph에서의 특정 디자인 패턴을 시연하기 위한 것이며, 필요에 따라 다른 기본 패턴과 결합하여 최적의 결과를 얻을 수 있습니다.
참고
1.1 환경 설정
# LangSmith 추적을 설정합니다. https://smith.langchain.com
# !pip install -qU langchain-teddynote
from langchain_teddynote import logging

# 프로젝트 이름을 입력합니다.
logging.langsmith("CH17-LangGraph-Use-Cases")
본 튜토리얼에 사용할 모델명을 설정합니다.
1.2 상태 정의
멀티 에이전트 시스템에서 활용할 상태(state)를 정의합니다.
1.3 에이전트 생성
1.3.1 도구(tool) 생성
이 예제에서는 검색 엔진을 사용하여 웹 조사를 수행하는 에이전트와 플롯을 생성하는 에이전트를 만듭니다.
아래에 사용할 도구를 정의합니다.
- Research:
TavilySearch도구를 사용하여 웹 조사를 수행합니다. - Coder:
PythonREPLTool도구를 사용하여 코드를 실행합니다.
1.4 Agent 생성하는 Utility 구현
LangGraph를 사용하여 다중 에이전트 시스템을 구축할 때, 도우미 함수는 에이전트 노드를 생성하고 관리하는 데 중요한 역할을 합니다. 이러한 함수는 코드의 재사용성을 높이고, 에이전트 간의 상호작용을 간소화합니다.
- 에이전트 노드 생성: 각 에이전트의 역할에 맞는 노드를 생성하기 위한 함수 정의
- 작업 흐름 관리: 에이전트 간의 작업 흐름을 조정하고 최적화하는 유틸리티 제공
- 에러 처리: 에이전트 실행 중 발생할 수 있는 오류를 효율적으로 처리하는 메커니즘 포함
다음은 agent_node라는 함수를 정의하는 예시입니다.
이 함수는 주어진 상태와 에이전트를 사용하여 에이전트 노드를 생성합니다. 이 함수를 나중에 functools.partial을 사용하여 호출할 것입니다.
from langchain_core.messages import HumanMessage


# 지정한 agent와 name을 사용하여 agent 노드를 생성
def agent_node(state, agent, name):
    # agent 호출
    agent_response = agent.invoke(state)
    # agent의 마지막 메시지를 HumanMessage로 변환하여 반환
    return {
        "messages": [
            HumanMessage(content=agent_response["messages"][-1].content, name=name)
        ]
    }
참고
functools.partial의 역할
functools.partial은 기존 함수의 일부 인자 또는 키워드 인자를 미리 고정하여 새 함수를 생성하는 데 사용됩니다. 즉, 자주 사용하는 함수 호출 패턴을 간소화할 수 있도록 도와줍니다.
역할
- 미리 정의된 값으로 새 함수 생성: 기존 함수의 일부 인자를 미리 지정해서 새 함수를 반환합니다.
- 코드 간결화: 자주 사용하는 함수 호출 패턴을 단순화하여 코드 중복을 줄입니다.
- 가독성 향상: 특정 작업에 맞춰 함수의 동작을 맞춤화해 더 직관적으로 사용 가능하게 만듭니다.
예시코드
agent_node라는 기존 함수가 있다고 가정합니다.- 이 함수는 여러 개의 인자와 키워드 인자를 받을 수 있습니다.
functools.partial은 이 함수에agent=research_agent와names="Researcher"라는 값을 고정합니다.즉, 이제
research_node는agent_node를 호출할 때agent와names값을 따로 지정하지 않아도 됩니다.예를 들어:
대신,
처럼 사용할 수 있습니다.
아래는 functools.partial을 사용하여 research_node를 생성하는 예시입니다.
import functools
from langgraph.prebuilt import create_react_agent
from langchain_openai import ChatOpenAI


# Research Agent 생성
research_agent = create_react_agent(ChatOpenAI(model="gpt-4o"), tools=[tavily_tool])

# research node 생성
research_node = functools.partial(agent_node, agent=research_agent, name="Researcher")
코드를 실행하여 결과를 확인합니다.
research_node(
    {
        "messages": [
            HumanMessage(content="Code hello world and print it to the terminal")
        ]
    }
)
1.4.1 Agent Supervisor 생성
에이전트를 관리 감독하는 감독자 에이전트를 생성합니다.
from pydantic import BaseModel
from typing import Literal

# 멤버 Agent 목록 정의
members = ["Researcher", "Coder"]

# 다음 작업자 선택 옵션 목록 정의
options_for_next = ["FINISH"] + members


# 작업자 선택 응답 모델 정의: 다음 작업자를 선택하거나 작업 완료를 나타냄
class RouteResponse(BaseModel):
    next: Literal[*options_for_next]
from langchain_core.prompts import ChatPromptTemplate, MessagesPlaceholder
from langchain_openai import ChatOpenAI
# 시스템 프롬프트 정의: 작업자 간의 대화를 관리하는 감독자 역할
system_prompt = (
"You are a supervisor tasked with managing a conversation between the"
" following workers: {members}. Given the following user request,"
" respond with the worker to act next. Each worker will perform a"
" task and respond with their results and status. When finished,"
" respond with FINISH."
)
# ChatPromptTemplate 생성
prompt = ChatPromptTemplate.from_messages(
[
("system", system_prompt),
MessagesPlaceholder(variable_name="messages"),
(
"system",
"Given the conversation above, who should act next? "
"Or should we FINISH? Select one of: {options}",
),
]
).partial(options=str(options_for_next), members=", ".join(members))
# LLM 초기화
llm = ChatOpenAI(model=MODEL_NAME, temperature=0)
# Supervisor Agent 생성
def supervisor_agent(state):
# 프롬프트와 LLM을 결합하여 체인 구성
supervisor_chain = prompt | llm.with_structured_output(RouteResponse)
# Agent 호출
return supervisor_chain.invoke(state)1.5 그래프 구성
이제 그래프를 구축할 준비가 되었습니다. 아래에서는 방금 정의한 함수를 사용하여 state와 worker 노드를 정의합니다.
import functools
from langgraph.prebuilt import create_react_agent
# Research Agent 생성
research_agent = create_react_agent(llm, tools=[tavily_tool])
research_node = functools.partial(agent_node, agent=research_agent, name="Researcher")
code_system_prompt = """
Be sure to use the following font in your code for visualization.
##### 폰트 설정 #####
import platform
# OS 판단
current_os = platform.system()
if current_os == "Windows":
# Windows 환경 폰트 설정
font_path = "C:/Windows/Fonts/malgun.ttf" # 맑은 고딕 폰트 경로
fontprop = fm.FontProperties(fname=font_path, size=12)
plt.rc("font", family=fontprop.get_name())
elif current_os == "Darwin": # macOS
# Mac 환경 폰트 설정
plt.rcParams["font.family"] = "AppleGothic"
else: # Linux 등 기타 OS
# 기본 한글 폰트 설정 시도
try:
plt.rcParams["font.family"] = "NanumGothic"
except:
print("한글 폰트를 찾을 수 없습니다. 시스템 기본 폰트를 사용합니다.")
##### 마이너스 폰트 깨짐 방지 #####
plt.rcParams["axes.unicode_minus"] = False # 마이너스 폰트 깨짐 방지
"""
# Coder Agent 생성
coder_agent = create_react_agent(
llm,
tools=[python_repl_tool],
state_modifier=code_system_prompt,
)
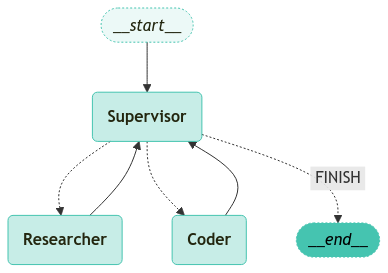
coder_node = functools.partial(agent_node, agent=coder_agent, name="Coder")from langgraph.graph import END, StateGraph, START
from langgraph.checkpoint.memory import MemorySaver
# 그래프 생성
workflow = StateGraph(AgentState)
# 그래프에 노드 추가
workflow.add_node("Researcher", research_node)
workflow.add_node("Coder", coder_node)
workflow.add_node("Supervisor", supervisor_agent)
# 멤버 노드 > Supervisor 노드로 엣지 추가
for member in members:
workflow.add_edge(member, "Supervisor")
# 조건부 엣지 추가 (
conditional_map = {k: k for k in members}
conditional_map["FINISH"] = END
def get_next(state):
return state["next"]
# Supervisor 노드에서 조건부 엣지 추가
workflow.add_conditional_edges("Supervisor", get_next, conditional_map)
# 시작점
workflow.add_edge(START, "Supervisor")
# 그래프 컴파일
graph = workflow.compile(checkpointer=MemorySaver())그래프를 시각화합니다.
1.6 팀 호출
생성된 그래프를 통해 이제 성능을 확인할 수 있습니다.
from langchain_core.runnables import RunnableConfig
from langchain_teddynote.messages import random_uuid, invoke_graph

# config 설정(재귀 최대 횟수, thread_id)
config = RunnableConfig(recursion_limit=10, configurable={"thread_id": random_uuid()})

# 질문 입력
inputs = {
    "messages": [
        HumanMessage(
            content="2010년 ~ 2024년까지의 대한민국의 1인당 GDP 추이를 그래프로 시각화 해주세요."
        )
    ],
}

# 그래프 실행
invoke_graph(graph, inputs, config)